2024年8月

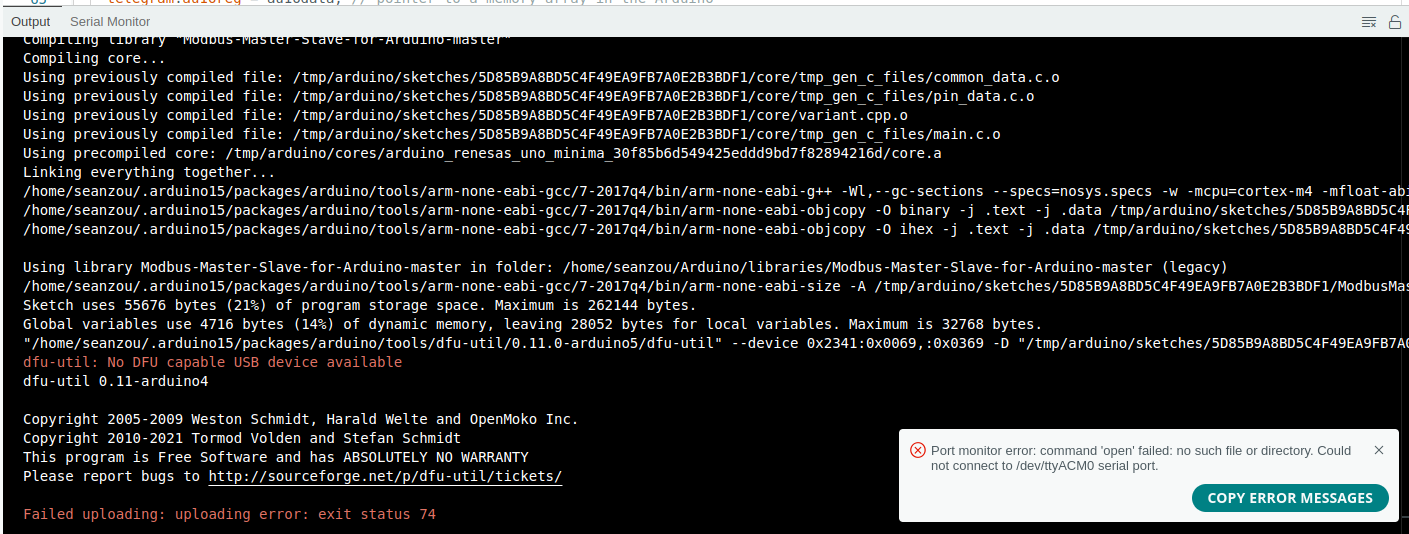
今天买的“Arduino Uno R4 Minima”到了,可是插上去发现,并不能像“Arduino Uno R4 Wifi”那样即插即用,而是出现了以下两个主要报错。

  1. dfu-util: Cannot open DFU device 2341:0369 found on devnum 107 (LIBUSB_ERROR_ACCESS)
  2. dfu-util: No DFU capable USB device available

查了一下,发现了解决办法,遂记录。

注:此方法只针对Ubuntu,但是问题《DFU Error - Cannot Upload Sketch to R4 Minima》中一样有针对Windows系统的解决办法。

正文

1. dfu-util: Cannot open DFU device 2341:0369 found on devnum 107 (LIBUSB_ERROR_ACCESS)

这个原因是因为运行或安装dfu-util的权限不够,很神奇,明明已经给了足够的权限了,还是不够权限,于是有大神写了以下一个脚本,然后将脚本放入/etc/udev/rules.d即可。

Screenshot from 2024-02-23 00-56-19-1

# UDEV Rules for Arduino UNO R4 boards
#
# This will allow reflashing with DFU-util without using sudo
#
# This file must be placed in:
#
# /etc/udev/rules.d
#
# After this file is installed, physically unplug and reconnect the device.
#
# Arduino UNO R4
# --------------
#
SUBSYSTEMS=="usb", ATTRS{idVendor}=="2341", ATTRS{idProduct}=="0069", GROUP="plugdev", MODE="0666"
SUBSYSTEMS=="usb", ATTRS{idVendor}=="2341", ATTRS{idProduct}=="0369", GROUP="plugdev", MODE="0666"
#
# If you share your linux system with other users, or just don't like the
# idea of write permission for everybody, you can replace MODE:="0666" with
# OWNER:="yourusername" to create the device owned by you, or with
# GROUP:="somegroupname" and mange access using standard unix groups.
#

  1. 创建一个文件名为99-arduino-uno-r4.rules,并且将以上内容复制进去。
  2. 将此文件位置放入/etc/udev/rules.d/99-arduino-uno-r4.rules
  3. 然后即可上传

This is far from only my work, credit should go to Julien Vanier and a a whole bunch of people who solved this same problem for 'Particle' boards some time ago.

2. dfu-util: No DFU capable USB device available

如果各位按照1中步骤做完了,仍然无法上传并且出现这个报错的话dfu-util: No DFU capable USB device available,那么很有可能是一个原因,没有启动bootloader,启动方法,摁两下Arduino开发板上的Reset按钮即可。

Screenshot from 2024-02-23 01-02-57

所以,解决办法为摁两下Arduino开发板上的Reset按钮即可。

这里既然介绍了Reset,那么就来介绍一下“摁一下Reset”和“摁两下Reset”的不同吧。

单次重置:

  • 功能:单次重置通常会重新启动微控制器,导致它重启并从头开始运行已加载的程序。
  • 用途:它用于重新启动设备,这对于故障排除或重置设备状态很有帮助。
  • 引导程序激活:在一些板子上,单次重置并不明确地将设备置入引导程序模式。相反,它仅仅重新启动微控制器上当前加载的任何程序。

双重重置:

  • 功能:快速连续进行双重重置会触发一种特殊模式,强制微控制器进入其引导程序。
  • 用途:这在你想要上传新代码到板子时特别有用。引导程序模式使微控制器准备好接收新固件,确保上传过程能够正确开始。
  • 为什么是双重重置?:一些板子使用双重重置机制作为区分标准重启(单次重置)和请求进入引导程序模式(双重重置)的方式。这是因为这些板子可能没有专门的引导程序模式进入机制或按钮,或者为了简化用户的操作过程。

简单总结:

  1. 按一下Reset(单次重置):重启Arduino,并且重新运行Arduino上烧录的程序。(部分无引导程序的板子用来重新加载板子上的任意程序)
  2. 按两下Reset(双重重置):强制启动bootloader(引导程序)模式,以便上传code。
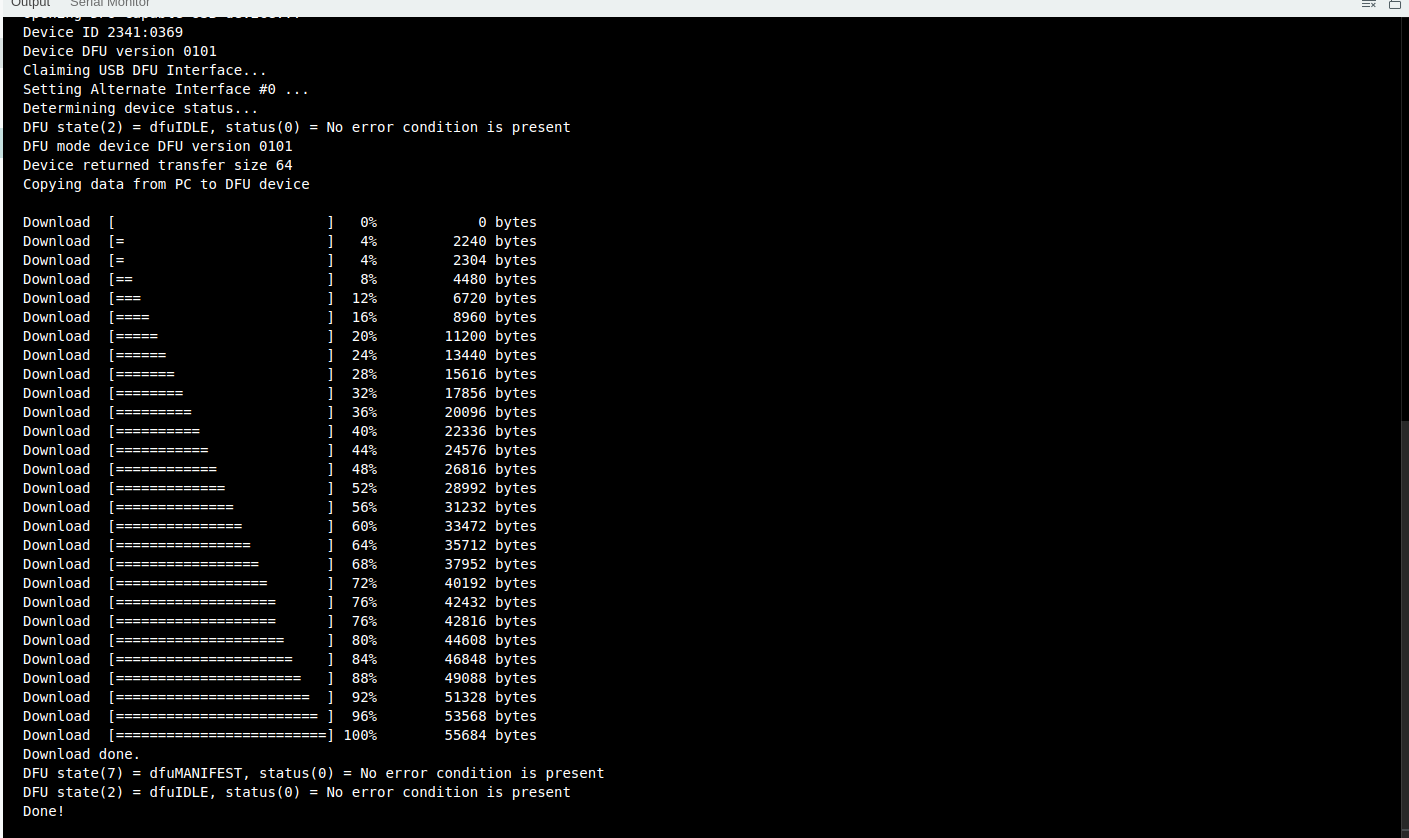
3. 结果

完结,成功上传,撒花!*★,°*:.☆( ̄▽ ̄)/$:*.°★* 。

Screenshot from 2024-02-23 01-06-29

总结

一步一步走来,坑,真多呀。

但是,希望未来自己再遇见坑的时候,能自信解决!或者回来这里找一下记录~!

  1. dfu-util: Cannot open DFU device 2341:0369 found on devnum 107 (LIBUSB_ERROR_ACCESS)
  2. dfu-util: No DFU capable USB device available

对于1的解决办法:

  1. 创建一个文件名为99-arduino-uno-r4.rules,并且将这里的内容复制进去。
  2. 将此文件位置放入/etc/udev/rules.d/99-arduino-uno-r4.rules
  3. 然后即可上传


# UDEV Rules for Arduino UNO R4 boards
#
# This will allow reflashing with DFU-util without using sudo
#
# This file must be placed in:
#
#       /etc/udev/rules.d
#
# After this file is installed, physically unplug and reconnect the device.
#
#       Arduino UNO R4
#       --------------
#
SUBSYSTEMS=="usb", ATTRS{idVendor}=="2341", ATTRS{idProduct}=="0069", GROUP="plugdev", MODE="0666"
SUBSYSTEMS=="usb", ATTRS{idVendor}=="2341", ATTRS{idProduct}=="0369", GROUP="plugdev", MODE="0666"
#
# If you share your linux system with other users, or just don't like the
# idea of write permission for everybody, you can replace MODE:="0666" with
# OWNER:="yourusername" to create the device owned by you, or with
# GROUP:="somegroupname" and mange access using standard unix groups.
#


一、服务器端配置文件(先购买VPS代理服务器):

       /usr/local/etc/v2ray/config.json

{
  "inbounds": [
    {
      "port": 10800,
      "listen": "0.0.0.0",
      "protocol": "vmess",
      "settings": {
        "clients": [
          {
            "id": "d660738b-3891-46fe-81a4-2228e3d557f5",
            "level": 1,
            "alterId": 64
          }
        ]
      }
    }
  ],
  "outbounds": [
    {
      "protocol": "freedom",
      "settings": {}
    }
  ]
}


二、客户端配置文件:

     {
"inbounds": [{
    "port": 1081,
    "listen": "127.0.0.1",
    "protocol": "socks",
    "settings": {
      "udp": true
    }
  }],
  "outbounds": [{
    "protocol": "vmess",
    "settings": {
      "vnext": [{
        "address": "204.10.19.198",
        "port": 10800,
        "users": [{ "id": "d660738b-3891-46fe-81a4-2228e3d557f5" }]
      }]
    }
  },{
    "protocol": "freedom",
    "tag": "direct",
    "settings": {}
  }],
  "routing": {
    "domainStrategy": "IPOnDemand",
    "rules": [{
      "type": "field",
      "ip": ["geoip:private"],
      "outboundTag": "direct"
    }]
  }
}


三、Ubuntu网络代理设置


https://virmach.com/best-cheapest-linux-vps/#
WEB account: ABB P: FreeWorld@202408
IP: 204.10.19.198

Ubuntu OS account: root     P: citi2024


OriginLab


Performing FFT to a signal with a large DC offset would often result in a big impulse around frequency 0 Hz, thus masking out the signals of interests with relatively small amplitude.

Remove_DC_Offset_Blog_10

Origin provides two methods to remove DC offset from the original signal before performing FFT:

  • Using FFT High-Pass Filter
  • Subtracting the Mean of Original Signal

Note that these two methods can get the same result. You can also not filter the input, but set zero to the zero frequency point for FFT result.

Using FFT High-Pass Filter

Any DC bias on the signal will show up in the frequency domain as amplitude at zero Hz, by setting the cutoff frequency to be zero DC offset can be filtered. Steps are as following:

  1. Import the fftfilter2.dat under Origin exe\Samples\Signal Processing\ folder.

  2. Highlight the source signal column Amplitude, and select menu Analysis: Signal Processing: FFT Filters.

  3. In the pop-up dialog, choose High Pass for Filter Type, uncheck Auto checkbox to set Cutoff Frequency to zero and clear the Keep DC offset check-box.

Remove_DC_Offset_Blog_07

  1. Click OK button to get the result without DC offset.

Remove_DC_Offset_Blog_08


Subtracting the Mean of Original Signal

  1. Now we have the original signal stored in column B (Amplitude). Hold Ctrl + D to add a new column C for storing DC offset removed signal and input DC Offset Removed as Long Name.

  2. Highlight column C, and select Set Column Values from the context menu to bring up the Set Values dialog.

  3. In Before Formula Scripts panel of the Set Values dialog, put the script:

stats col(b);

Then in the column formula text box, fill column C using the formula:

col(b)-stats.mean

Remove_DC_Offset_Blog_03

  1. Column C is the result without DC offset.

Remove_DC_Offset_Blog_09


Tips: 

If you need to get the DC offset, open the dialog mentioned in method one, then use the low-pass filter, and set Cutoff Frequency to zero, or use the Mean function to calculate the mean of the signal:

DCOffset = Mean(col(B));