Train YOLOv8 Instance Segmentation on Custom Data
Image segmentation is a core vision problem that can provide a solution for a large number of use cases. Starting from medical imaging to analyzing traffic, it has immense potential. Instance segmentation, i.e., object detection + segmentation, is even more powerful as it allows us to detect and segment objects in a single pipeline. For this purpose, the Ultralytics YOLOv8 models offer a simple pipeline. In this article, we will carry out YOLOv8 instance segmentation training on custom data.
While going through the training process of YOLOv8 instance segmentation models, we will cover:
- Training of three different models, namely, YOLOv8 Nano, YOLOv8 Small, and YOLOv8 Medium model.
- Analyze the results for each of the models.
- Carry out inferences using the trained models.
This will allow us to explore each aspect of the training pipeline. Furthermore, it will also equip us with adequate knowledge to use YOLOv8 instance segmentation models in our own projects.
- The Underwater Trash Instance Segmentation Dataset
- The YOLOv8 Instance Segmentation Label Format
- Preparing the Dataset YAML File
- Training YOLOv8 Nano Instance Segmentation Model
- Training YOLOv8 Small Instance Segmentation Model
- Training YOLOv8 Medium Instance Segmentation Model
- Comparison Between the Trained Models
- Inference on Validation Images
- Inference on Videos
- Summary
YOLO Master Post – Every Model Explained
Don’t miss out on this comprehensive resource, Mastering All Yolo Models for a richer, more informed perspective on the YOLO series.
The Underwater Trash Instance Segmentation Dataset
We will use the TrashCan 1.0 An Instance-Segmentation dataset to train the YOLOv8 models. This dataset consists of underwater imagery to detect and segment trash in and around the ocean floor.
There are two versions of the instance segmentation dataset: an instance version and a material version. For our purpose, we will use the material version as it is easier to solve with fewer classes.
Originally, the annotations were in JSON format. We have already converted the dataset into a YOLO text file format that you can directly download.
The dataset contains 6008 training instances and 1204 validation instances. There are a total of 16 classes in the dataset. The following are the classes, along with their label indices.
1
2
3
4
5
6
7
8
9
10
11
12
13
14
15
16
17
18
|
{ 0: 'rov', 1: 'plant', 2: 'animal_fish', 3: 'animal_starfish', 4: 'animal_shells', 5: 'animal_crab', 6: 'animal_eel', 7: 'animal_etc', 8: 'trash_etc', 9: 'trash_fabric', 10: 'trash_fishing_gear', 11: 'trash_metal', 12: 'trash_paper', 13: 'trash_plastic', 14: 'trash_rubber', 15: 'trash_wood',} |
Here are a few examples from the dataset to get a better understanding of the type of images we are dealing with.
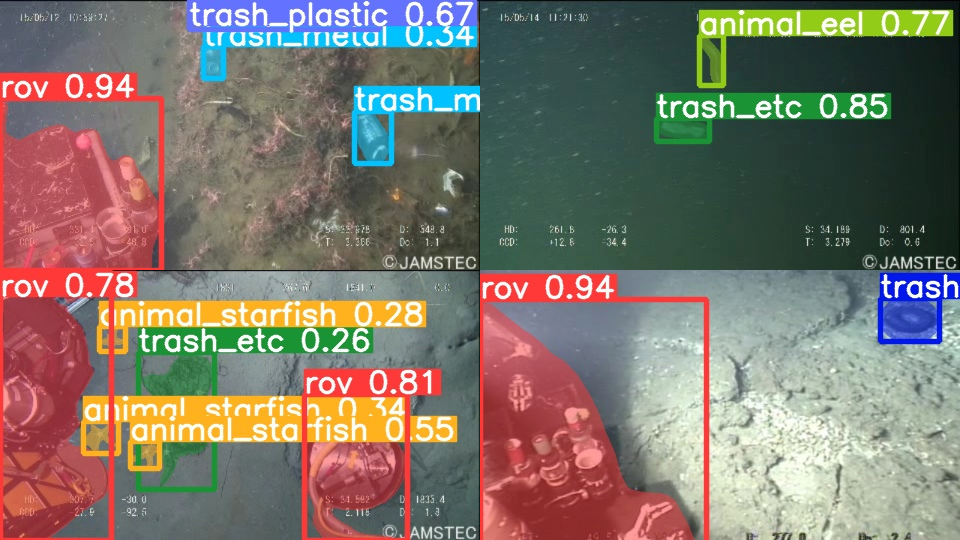
As we can see, the dataset seems challenging. Most of the objects are small, and a lot of the trash material looks similar. However, solving such a detection and segmentation problem will allow unmanned underwater robots to pick up trash automatically.
If you intend on training the models locally, you can download the dataset through this link.
In case you would like to use cloud GPU providers or Colab, you can use the Jupyter Notebook that comes with this post via the above download link.
But first, let’s go into the technical parts of this article.
The YOLOv8 Instance Segmentation Label Format
We know that YOLO models need labels in text file format. For detection, each new line in a text file indicates an object. Following is an example:
1
|
8 0.575 0.381474 0.5875 0.377771 |
In the above examples, the class index of the object is 8, and the rest of the numbers indicate x_center, y_center, width, and height of the bounding box in a normalized format.
But how do we represent an instance segmentation object?
Let’s see an example that will make it much easier to understand the format.
1
|
8 0.575 0.381474 0.5875 0.377771 0.599996 0.355556 0.602079 0.311111 0.595833 0.300007 0.566667 0.300007 0.564583 0.314822 0.554167 0.314822 0.55 0.325933 0.535417 0.329637 0.529171 0.340741 0.529171 0.351852 0.535417 0.359252 0.545833 0.359252 0.554167 0.374067 0.558333 0.370363 0.575 0.381474 |
In this case, the first five numbers still encode the class index and bounding box information. The rest of the numbers encode the boundary of the object that we are trying to segment. Starting from the 6th number, we have space-separated x-y coordinates for each point on the boundary of the object for the segmentation mask.
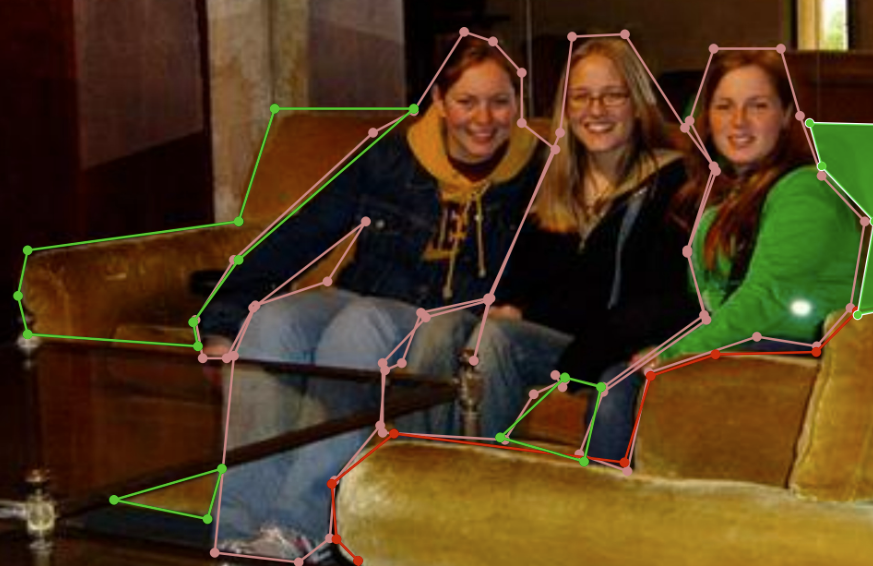
Primarily, from a visual point of view, the segmentation boundary around an object will look like the following.
If you need a primer of inference using YOLO instance segmentation models, then YOLOv5 for instance segmentation is a starting point.


Preparing the Dataset YAML File
Before we move ahead with the training, we first need to prepare the dataset YAML file. We name it trashcan_inst_material.yaml and here are its content.

1
2
3
4
5
6
7
8
9
10
11
12
13
14
15
16
17
18
19
20
|
names: 0: rov 1: plant 2: animal_fish 3: animal_starfish 4: animal_shells 5: animal_crab 6: animal_eel 7: animal_etc 8: trash_etc 9: trash_fabric 10: trash_fishing_gear 11: trash_metal 12: trash_paper 13: trash_plastic 14: trash_rubber 15: trash_woodpath: underwater_trash_instancetrain: train/imagesval: val/images |
The YAML file contains four attributes:
names: The class names starting from index 0 to number of classes – 1.path: The absolute path to the dataset directory.train: The training folder path inside the dataset directory.val: The validation folder path inside the dataset directory.
All four attributes are mandatory to start the training process correctly. Later, we will use the same YAML for training all three YOLOv8 instance segmentation models.
You will need to install the ultralytics API to train locally. This YOLOv8 tutorial contains the necessary steps to install it and also all inferences using several models.
Note: All training experiments were run on a machine with an Intel Xeon processor, 16 GB P100 GPU, and 32 GB of RAM.
Training YOLOv8 Nano Instance Segmentation Model
We will begin with the training of the Nano model – the smallest model in the YOLOv8 instance segmentation family.
Before starting the training, ensure the YAML file is in the same directory where you open the terminal else you will get a path error.
To start the training, execute the following command in the terminal.
1
|
yolo task=segment mode=train model=yolov8n-seg.pt imgsz=640 data=trash_inst_material.yaml epochs=100 batch=16 name=yolov8n-seg exist_ok=True amp=False |
We use the yolo CLI to train the model. We use the following command line arguments in the above command:
task: This argument indicates the task we want to perform using the model. As we are training an instance segmentation model, the task here issegment.mode: We can choose fromtrain,predict, andvalfor the mode. Here, the mode is training specific.model: This directly accepts the pretrained weight file name. If not already present, theyoloCLI will download it for the first time.imgsz: The number of pixels on the longer side. By default, all YOLO models accept images reshaped with an aspect ratio maintained.data: The path to the dataset YAML file.epochs: This is the number of epochs we want to train the model on the dataset.name: We can provide a custom result directory name using this argument.exist_ok: This tells the CLI to use the same result directory if present without creating a new one.amp: AMP stands for Automatic Mixed Precision. We are turning it off as some GPUs may not support it.
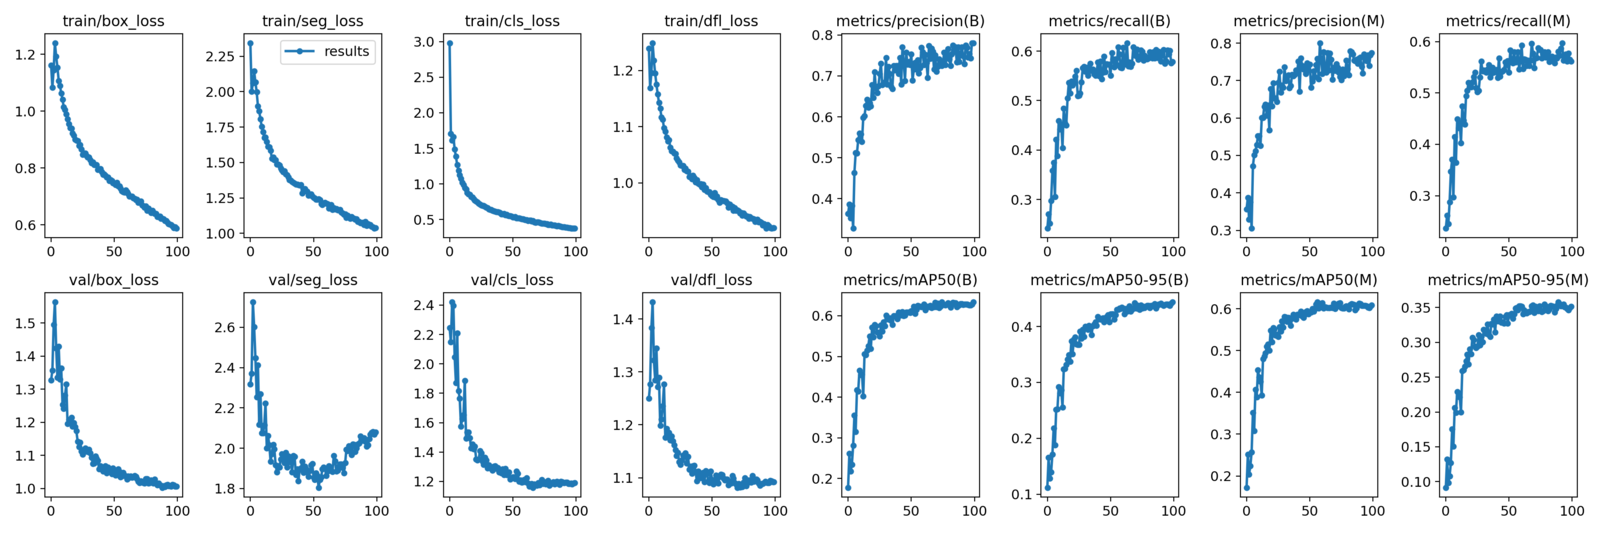
After training the model for 100 epochs, we get the following result.
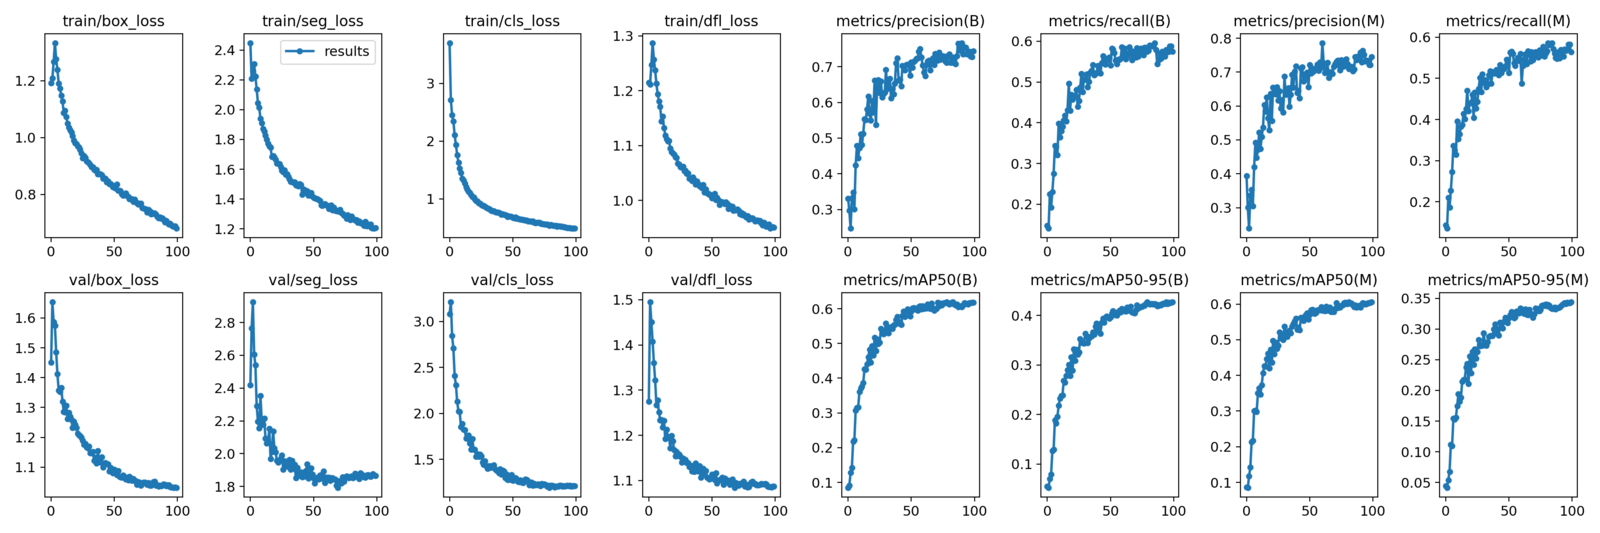
The graphs under (B) indicate the bounding box metrics and the ones under (M) indicate segmentation mask metrics.
The Nano model reaches box mAP of 42.6% and segmentation mAP of 34.5% on the last epoch. From the graphs, it looks like there is still room for improvement. But instead of training the Nano model for longer, let’s train a larger model.
Training YOLOv8 Small Instance Segmentation Model
To start the Small model training, we need to change the model and the resulting directory name.
1
|
yolo task=segment mode=train model=yolov8s-seg.pt imgsz=640 data=trash_inst_material.yaml epochs=100 batch=16 name=yolov8s-seg exist_ok=True amp=False |
The Small model reaches slightly higher metrics within the same number of epochs. This time, the last epoch’s box mAP is 44.38%, and the segmentation mask mAP is 35.16%.
This appears to be a significant enhancement compared to our prior training experiment. Additionally, employing an even larger model could yield even more impressive outcomes.
Training YOLOv8 Medium Instance Segmentation Model
For our final training experiment, we will train the YOLOv8 Medium model for instance, segmentation.
Like the previous one, we only need to change the model name and experiment name in the training command.
1
|
yolo task=segment mode=train model=yolov8m-seg.pt imgsz=640 data=trash_inst_material.yaml epochs=100 batch=16 name=yolov8m-seg exist_ok=True amp=False |

With the YOLOv8 Medium model, we have the highest box mAP yet of 45%. Also, the segmentation mask mAP reaches 36.2%.
Clearly, this is the best model we have till now. For inference, we will use the weights of the YOLOv8 Medium mode.
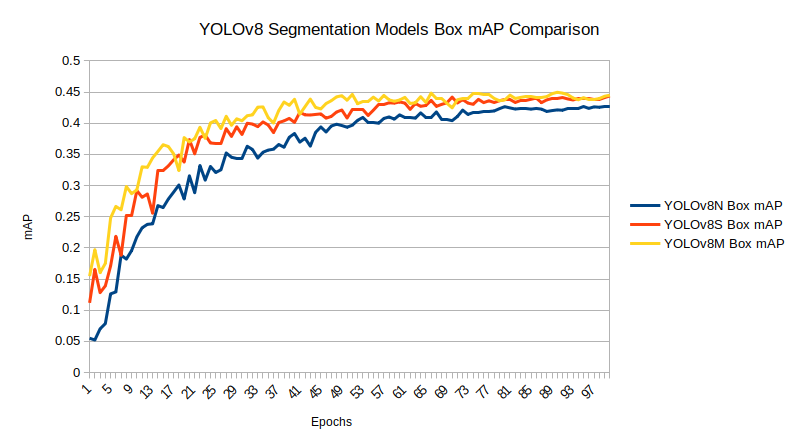
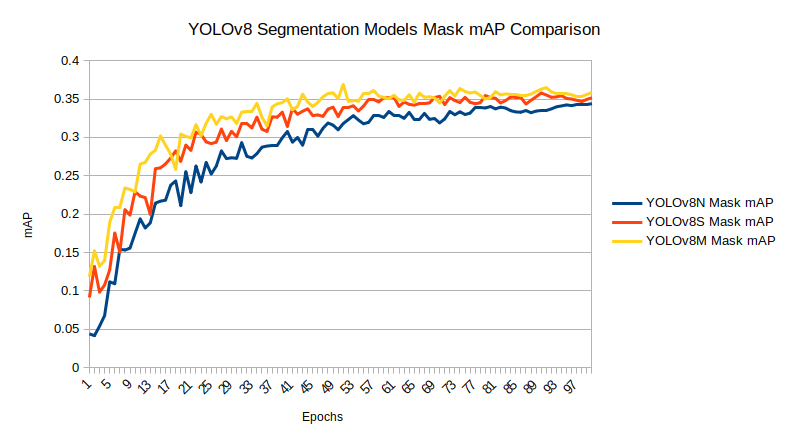
Comparison Between the Trained Models
Before moving on to the inference section, let’s take a look at the box and segmentation mAP graphs of each of the trained models.
Inference on Validation Images
First, we will run inferences on the validation images and check the YOLOv8 Medium model’s performance.
Note: The inference experiments were run on a laptop with an i7 8th generation CPU, 6 GB GTX 1060 GPU, and 16 GB RAM.
The following command expects that the trained weights are in the runs directory created from the model training experiments.
1
|
yolo model=runs/segment/yolov8m-seg/weights/best.pt mode=predict source=trash_inst_material/val/images name=yolov8m_seg_infer_valimages exist_ok=True |
We provide the path to the validation images directory, and the command will run inference on all images.
The following is a video where the inference image results have been combined into a single video. This provides an easier way to analyze the results.
The results are not perfect, but they are exceptional. The model has demonstrated accurate segmentation of the ROV in a majority of the frames, including challenging classes such as trash_wood.
Inference on Videos
For inference on videos, we have chosen a few videos that were part of the test set of the initial version of this dataset. These videos are complex and contain a lot of objects in a single frame.
There are two videos for inference that you can access while downloading the code for this article. We can execute the following command to start the experiments.
1
|
yolo model=runs/segment/yolov8m-seg/weights/best.pt mode=predict source=trash_segment_inference_data/manythings.mp4 name=runs_medium exist_ok=True |
This time, the source file is the video file that we want to run inference on.
Here are the results.
It is clear this is a highly complex scene. Let’s break down all the places where the model is performing well and where it isn’t.
- In the first few frames, there is a lot of flickering. This is mostly because of fast camera movement, and because of this, the segmentation and detection predictions suffer.
- After a while, the predictions become much better, but when the ROV first appears, the model cannot detect it. This is because of the high number of objects already present in the bottom right corner.
- In the final few frames, there is a crab present in the scene which the model cannot predict.
With the GTX 1060 GPU, we are getting over 30 FPS which is real-time performance.
Let’s run a final experiment on a simpler video.
1
|
yolo model=runs/segment/yolov8m-seg/weights/best.pt mode=predict source=trash_segment_inference_data/several.mp4 name=runs_medium exist_ok=True show=True |
Interestingly, the model detects the distant trash classes correctly but is unable to detect the fish correctly.
Articles On YOLO That You Should Not Miss
- Train YOLOv8 on Custom Dataset – A Complete Tutorial
- YOLOR – Paper Explanation & Inference – An In-Depth Analysis
- Performance Comparison of YOLO Object Detection Models – An Intensive Study
- YOLOv6 Custom Dataset Training – Underwater Trash Detection
- YOLOv7 Pose vs MediaPipe in Human Pose Estimation
- YOLOX Object Detector Paper Explanation and Custom Training
- Fine Tuning YOLOv7 on Custom Dataset
Summary
In this article, we went through the process of training three different instance segmentation models using the Ultralytics library. We chose a fairly difficult real-world dataset that presents a considerable challenge to today’s object detection and segmentation models. Although the results were not perfect, we have a starting point.
The above results show how difficult instance segmentation problems can be when trying to solve a real-world problem. Throwing huge models at them for training is not a solution, as we need real-time performance most of the time. Share your thoughts in the comments on how to enhance this project and develop an even more advanced model.


![[video-to-gif output image]](https://cdn.prod.website-files.com/63c6be5d69abf87798adedb7/6419b2b618b45d9ff61c55e6_ezgif-5-858dbfd13a.gif)

![[video-to-gif output image]](https://cdn.prod.website-files.com/63c6be5d69abf87798adedb7/6419b85c9481c0f863533a87_ezgif-5-5a79484185.gif)
